How to care for Black-Eyed Susan?
Black-Eyed Susans are incredibly easy-care flowers, and they're native to the United States. Since these unfussy perennials are used to American climates, they don't need much help from the gardener! Just make sure to plant your Black-Eyed Susans in a sunny location with well-draining soil, and they'll perform wonderfully.
Unless you experience a long dry spell, you don't need to water or fertilize your Black-Eyed Susans. They can handle dry weather and low-quality soil, especially once they've been established in a location for a growing season. For the first year, check your Black-Eyed Susans regularly to make sure they don't get too dry. If you live in a zone with bitterly cold winters, mulch the plants after the first growing season to insulate them. After they're well settled, these plants are drought and heat tolerant, and very hardy!
The only care regularly needed each season for Black-Eyed Susans is deadheading. Remove the spent flowers after they fade, to keep the plants looking vibrant. Then, divide the plant every three or four years to keep it from becoming overcrowded. Division and deadheading can both help prevent excessive spreading, too, so that you don't end up with too many Black-Eyed Susans. If you want to attract birds to your garden, however, leave a few flower heads on your plants in the fall, and the birds will take care of cleanup.
Can Black-Eyed Susan be grown in a container?
Black-Eyed Susans have deep, wide root systems, so they aren't ideal for growing in pots or planters. However, growing these perennials in containers can be achieved! Use a large pot, at least one gallon in size, for each plant, and make sure the container has excellent drainage. Moist potting soil makes a good medium for planting Black-Eyed Susans. Place the containers in a sunny location, and water regularly, as potted plants tend to dry out more quickly than plants set in the ground.
How far apart should Black-Eyed Susan roots be planted?
Plant your Black-Eyed Susans 18 to 24 inches apart. These plants do spread widely, so give them room to grow both up and out.
What are the best soil conditions for growing Black-Eyed Susan?
Black-Eyed Susans are native plants, so they work well in most North American soils, as long as the soil is well-draining. Black-Eyed Susans tolerate a wide range of soil types, including clay soil and lightweight loam. However, they perform at their best in neutral pH soil with good moisture content that is neither dried out nor soggy. If your soil dries out constantly, or contains lots of sand, consider mixing some compost into the soil to improve moisture and nutrient content.
When should you divide Black-Eyed Susan?
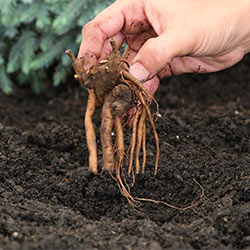
Black-Eyed Susans should be divided every three to four years to ensure healthy plants. The best time to divide Black-Eyed Susans is in the spring or the fall. Before dividing your Black-Eyed Susan, trim the foliage to within six inches of the ground. Dig around the plants, and pull the entire clump up from the ground. Dust the soil off the plants, or rinse them with a hose. Separate the plant sections with a sharp spade or knife, and make sure that each section has three or four strong-looking shoots. Replant your divided Black-Eyed Susan immediately, and water in your "new" plants for best results.
How often should Black-Eyed Susan be fertilized?
Black-Eyed Susans are very adaptable plants, and not too picky about soil or feeding. But, if you want to ensure your Black-Eyed Susans have the best start possible to each season, apply a balanced fertilizer to the planting site in the spring, just as the shoots begin to pop up.


